How to handle an MSIG account with a time delay
The permission management system of EOS allows users to set up a permission management structure of an EOS account with transaction delays, which involves the waits permission role in the permission. The concept of waits, also known as transaction delay, operates on the principle that if a proposal has been approved by all other authorization roles but their combined weight is still insufficient to meet the threshold, waits will automatically add its weight to the proposal after a set delay time. If the proposal's weight reaches the threshold, it will be approved successfully.
What are the benefits of this transaction delay? For example, suppose an organization's EOS account is to be jointly managed by five members of the organization's council, and at least two members must approve all account transactions. In that case, the account can set up a transaction delay permission (waits) to ensure that if some members act maliciously, other members have enough time to stop unexpected transactions from being executed.
Setting transaction delays can significantly improve the security of the account.
Next, let's talk about how to set up a permission structure with a waits permission role, the transaction delay permission, and how to initiate a transaction proposal that requires a delay.
I. Design the permission structure
Before setting up the permission, we must design the permission structure based on the expectation. In this tutorial, we set the active permission of the account to a multi-signature management structure. Under this permission structure, if two newly added accounts want to execute transactions, both of them need to approve the proposal, and the proposal can only be executed 24 hours (86400 seconds) after the proposal has been approved by both of them. The Active Permission structure of the account will be designed as follows:
The Active Permission (threshold: 3):
Original key (weight: 3)
Account A @active (weight: 1)
Account B @active (weight: 1)
Waits: 86400 (weight: 1)
II. Set up multi-signature permission
Here, we use the advanced permission management feature of the blockchain explorer bloks.io to set up the account's multi-signature permission.
If you visit bloks.io on desktop, click log in on the top right of the page to log in by Anchor wallet or another wallet for desktop.
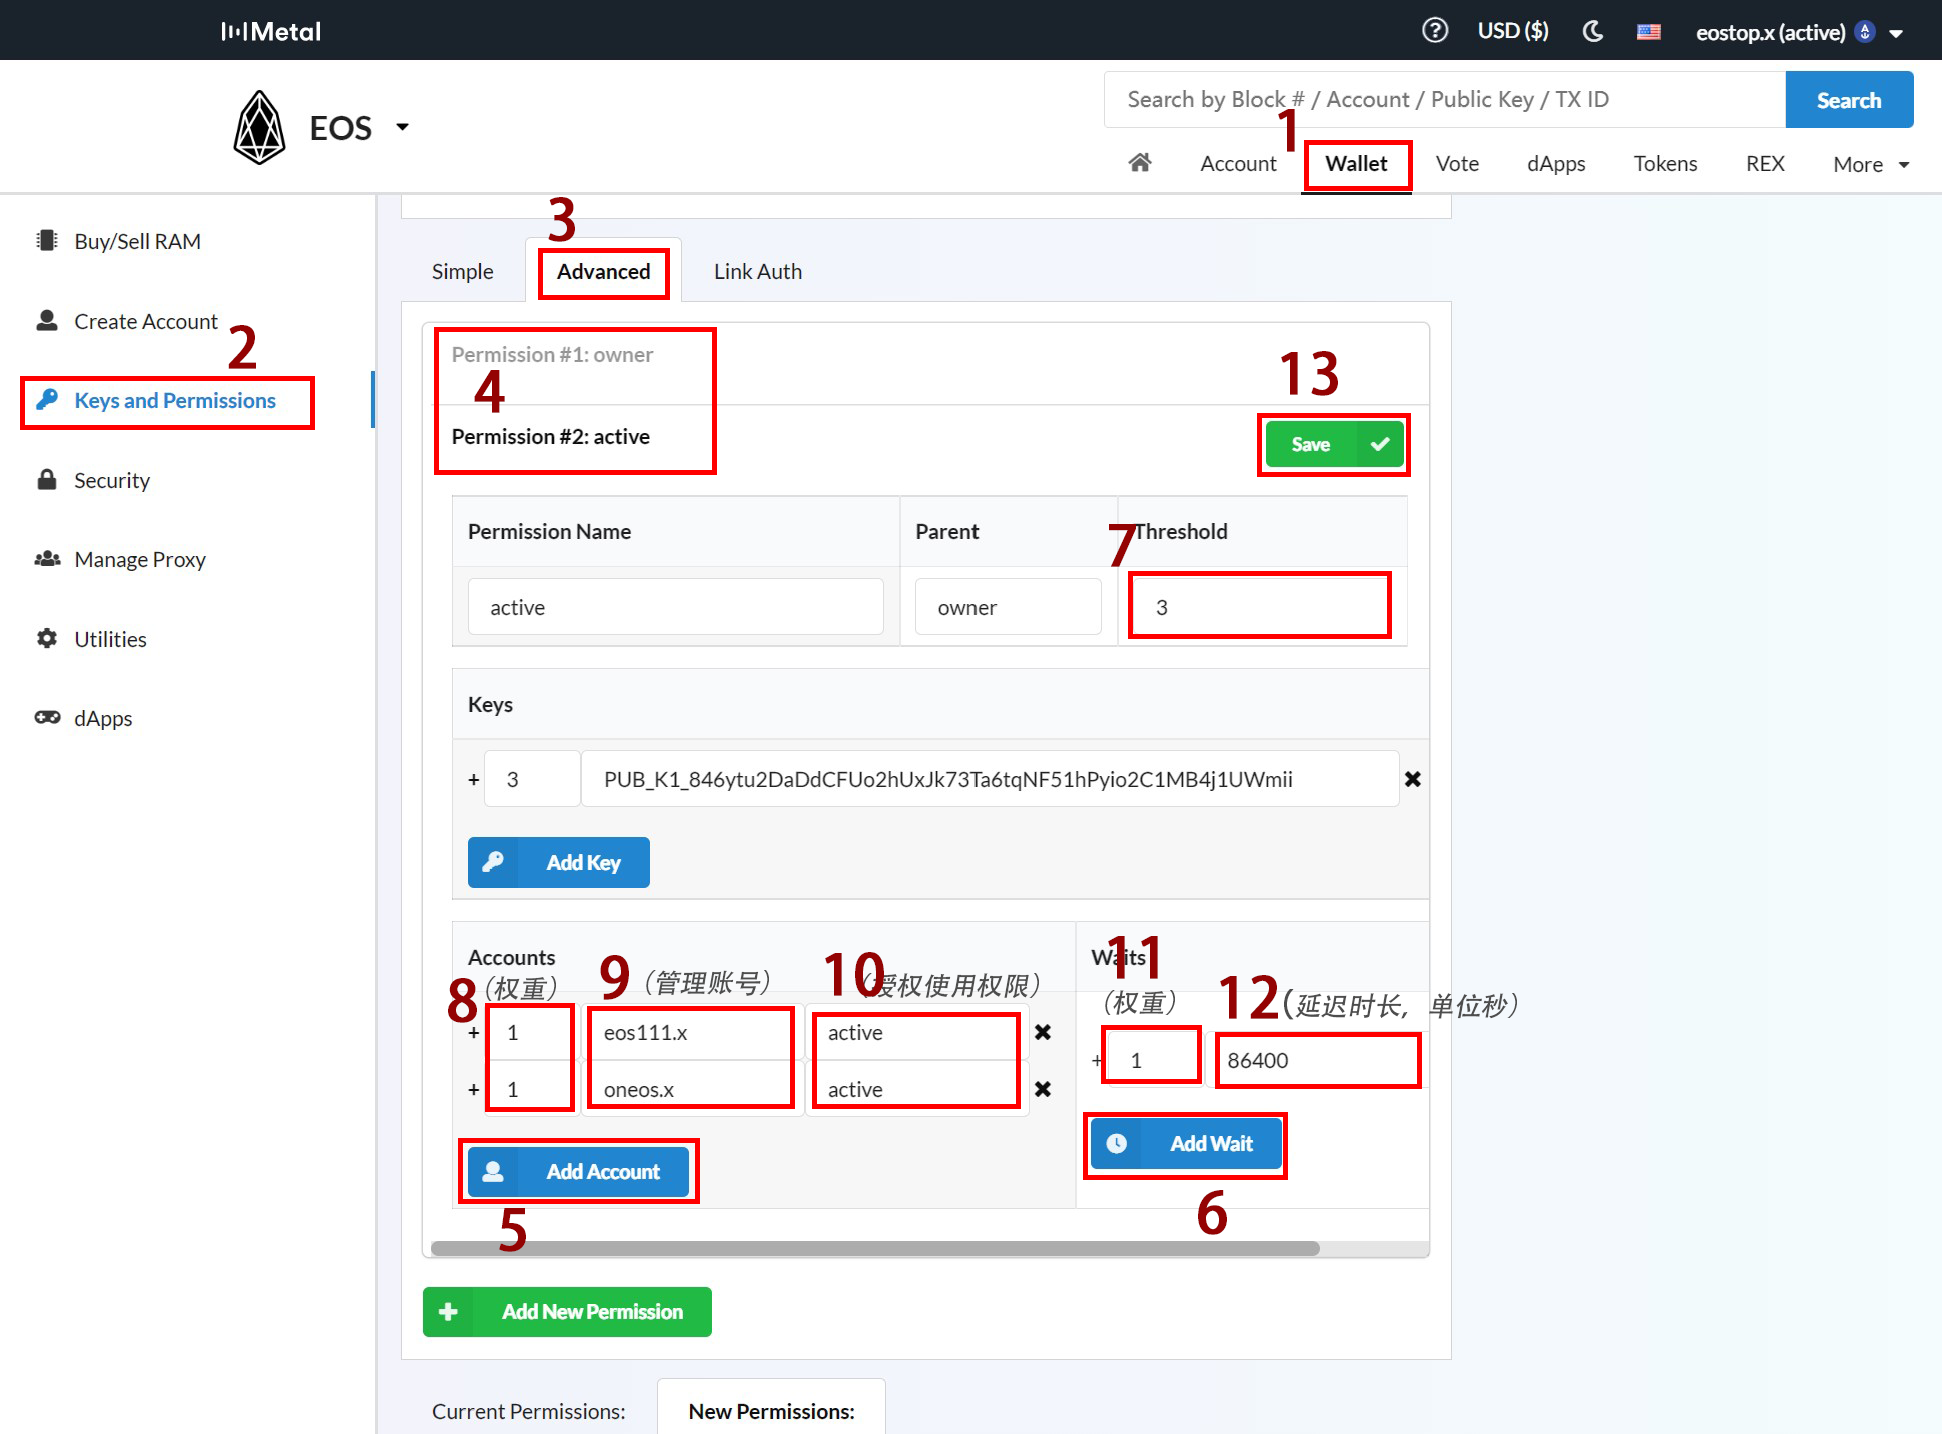
Then, as shown above, click on Wallet --> Keys and Permissions --> Advanced --> Permission #2: active (if you want to modify the owner permission, click on Permission #1: owner at position 4).
If you visit bloks.io on your phone, click log in on the top right of the page to log in with Anchor wallet or another wallet on your phone.
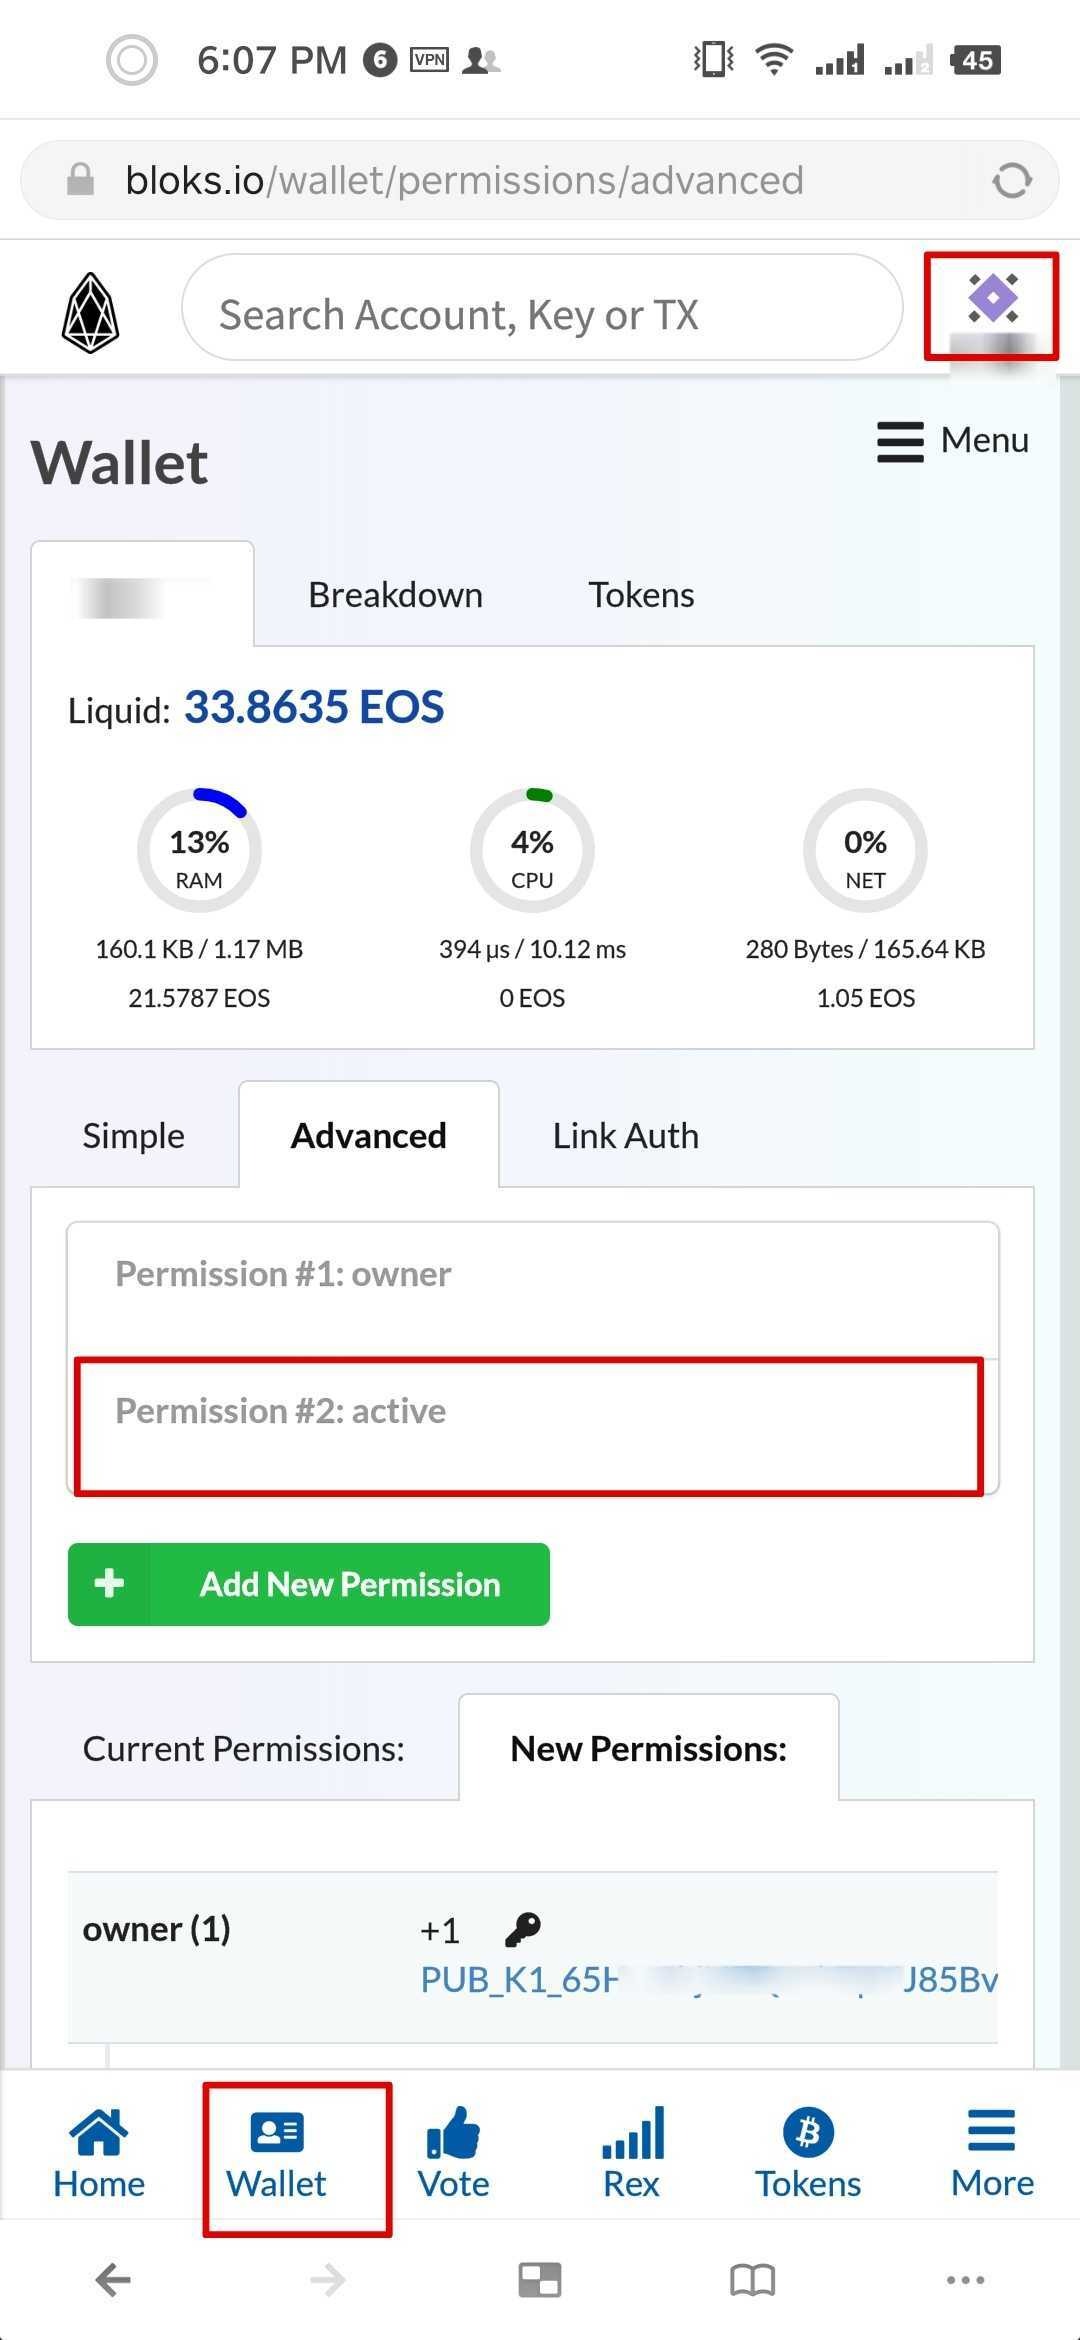
Then, as shown above, click on Wallet --> Keys and Permissions --> Advanced --> Permission #2: active (if you want to modify the owner permission, click on Permission #1: owner at position 4).
Following these steps, you will enter the permission structure setting interface. Click Add Account at position 5 to add the multi-signature management account input fields.
In this tutorial, we set up two multi-signature management accounts, so we click on position 5 twice. And in the input fields that appear at positions 7, 8, 9, and 10, respectively, enter the threshold, weight (i.e., the weight we designed in the permission structure), account name, and account permission used.
In the permission structure we designed, the threshold is 3, the weight is 1 for each account, and the account permission used by the account is active.
Click Add wait at position 6 to add the waits permission input field. Then, enter the weight and delay time value (in seconds) of the wait permission in the input fields at positions 11 and 12. In the permission structure we designed, the weight of wait is 1, and the delay time value is 86400.
After filling them in correctly, click save at position 13 to save and update the permission settings. After clicking on 13, a dialog box for verifying the account management wallet will pop up. Once verified, the permission management structure will be updated.
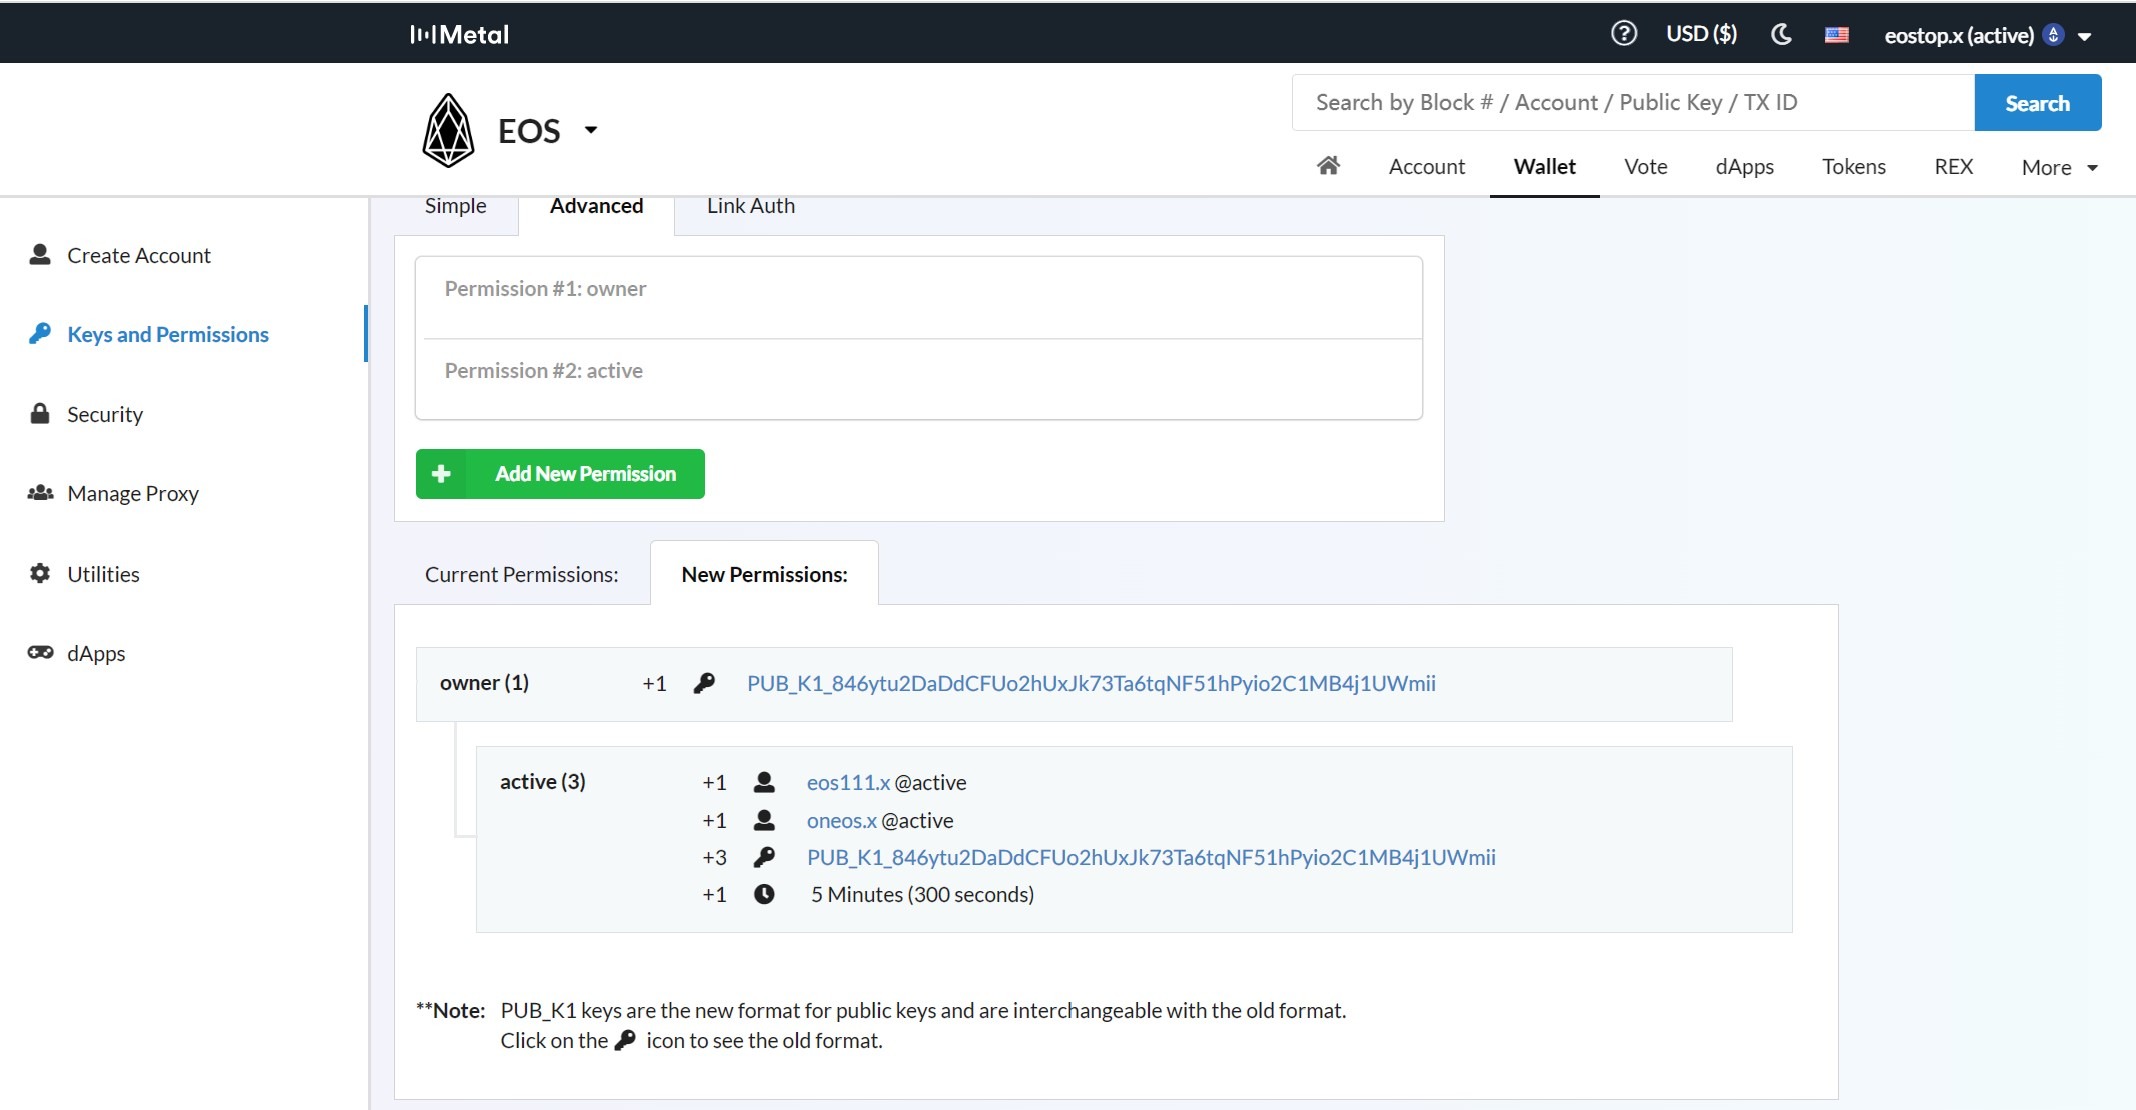
As shown above, after submitting the verification, refresh the permission management interface of bloks.io, and the latest permission management structure will be displayed.
III. Initiating a multi-signature transfer proposal
To initiate a multi-signature transfer proposal, we still use bloks.io. Any EOS account can initiate a multi-signature proposal for any EOS account. However, because the management key of the multi-signature account with sufficient weight can independently complete the transaction authorization operation without going through multi-signature, the proposal is usually initiated by other accounts, not the multi-signature account itself. Usually, it is one of the management accounts participating in the multi-signature. In the example below, we use one of the management accounts participating in the multi-signature.
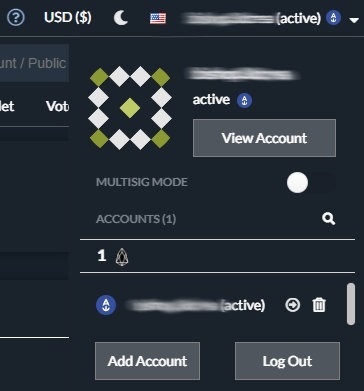
To initiate a multi-signature proposal, we first need to switch bloks.io to multi-signature mode. As shown above, in the window that appears after clicking on the account in the upper right corner, set the switch to the right of MULTISIG MODE to blue and turn it on.
Note:
When the MULTISIG MODE is turned on, any actions initiate a multi-signature proposal. This tutorial will show you how to initiate a multi-signature transfer proposal. It is similar to other types of transactions. Just turn on MULTISIG MODE, then proceed.
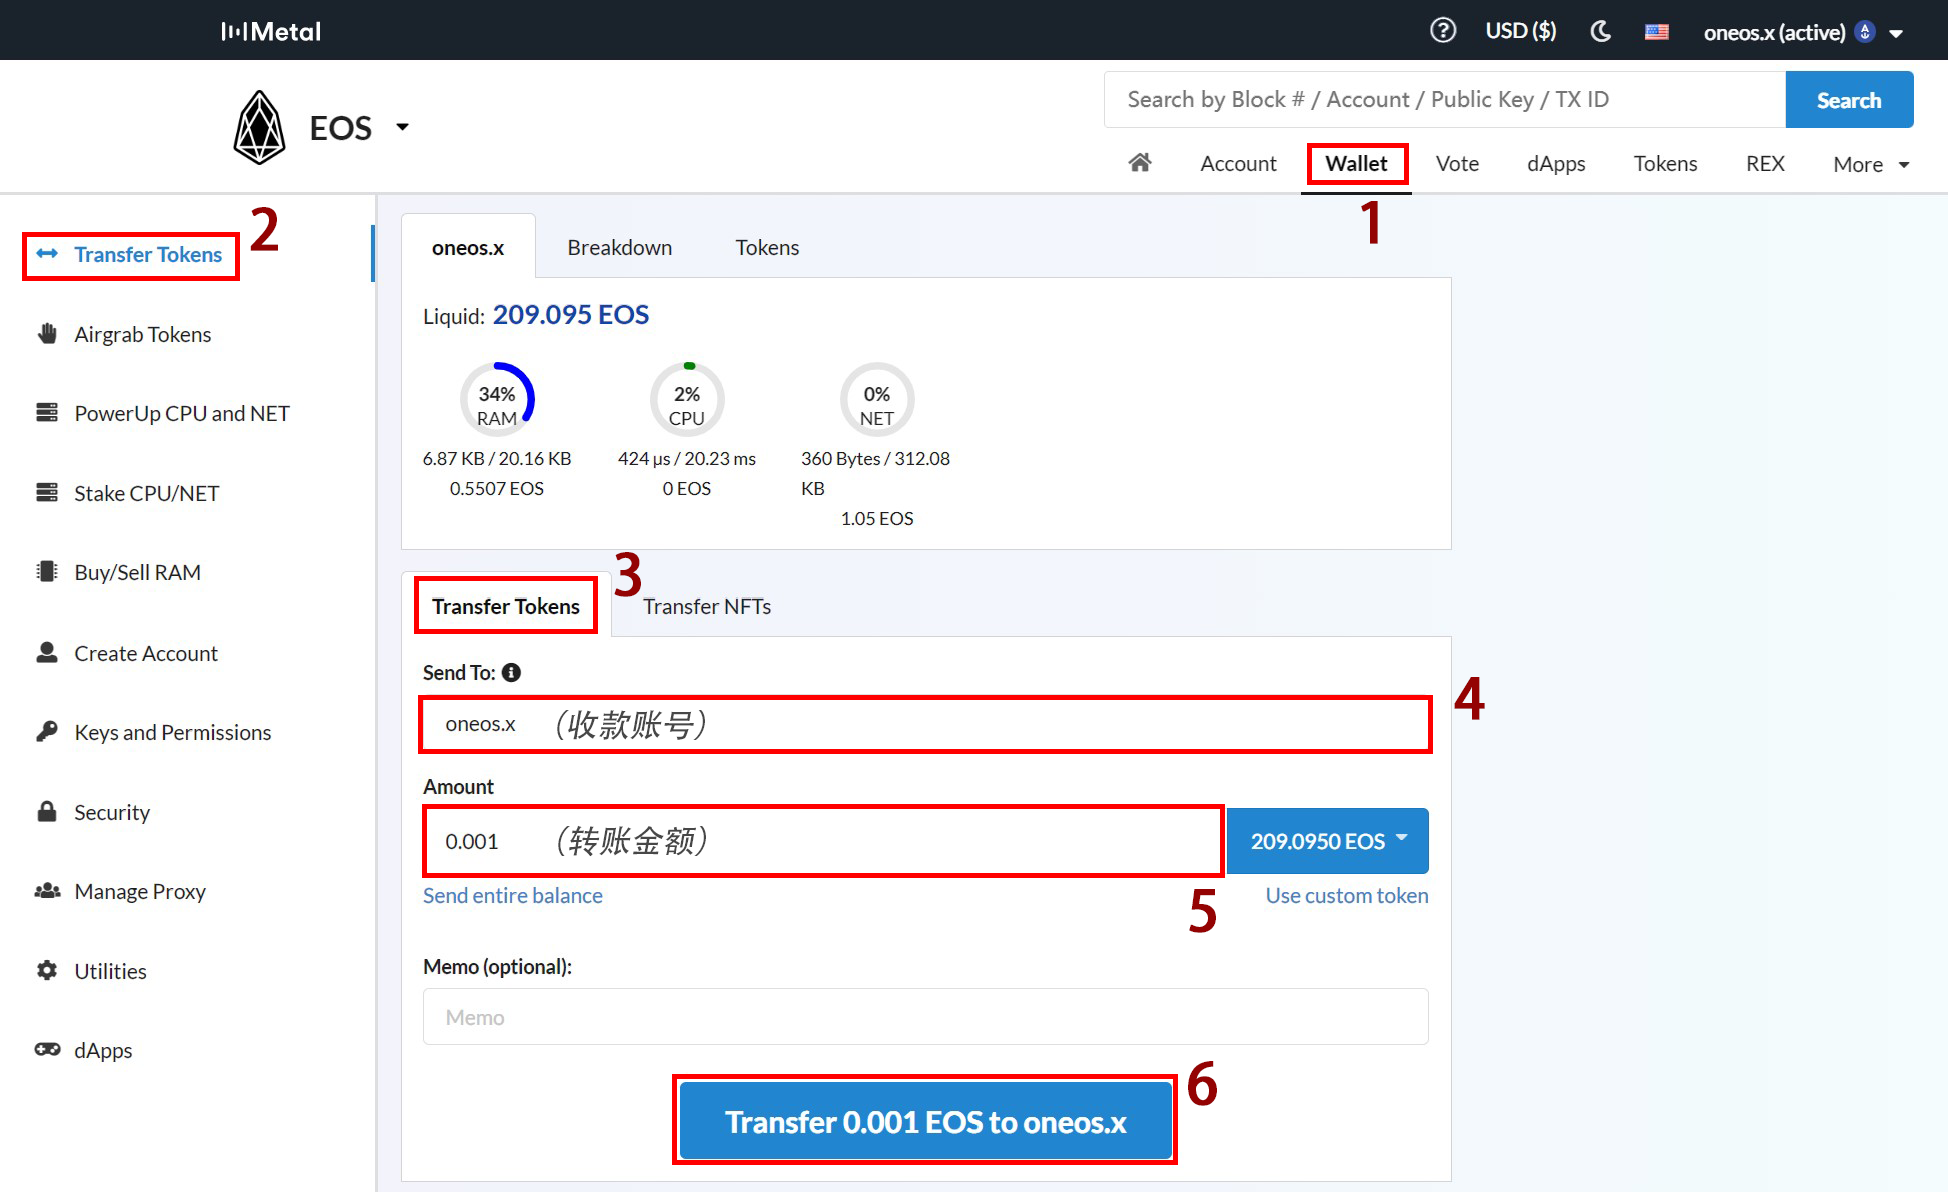
Then, as shown above, click on 1 Wallet --> 2 Transfer Tokens --> 3 Transfer Tokens.
Then, enter the receiving EOS account and the amount in the input fields that appear at positions 4 and 5. You can also choose the token type behind the transfer amount, which defaults to the EOS token.
After filling in, click the button at position 6, and the interface will then jump to the transfer proposal initiation interface shown below.
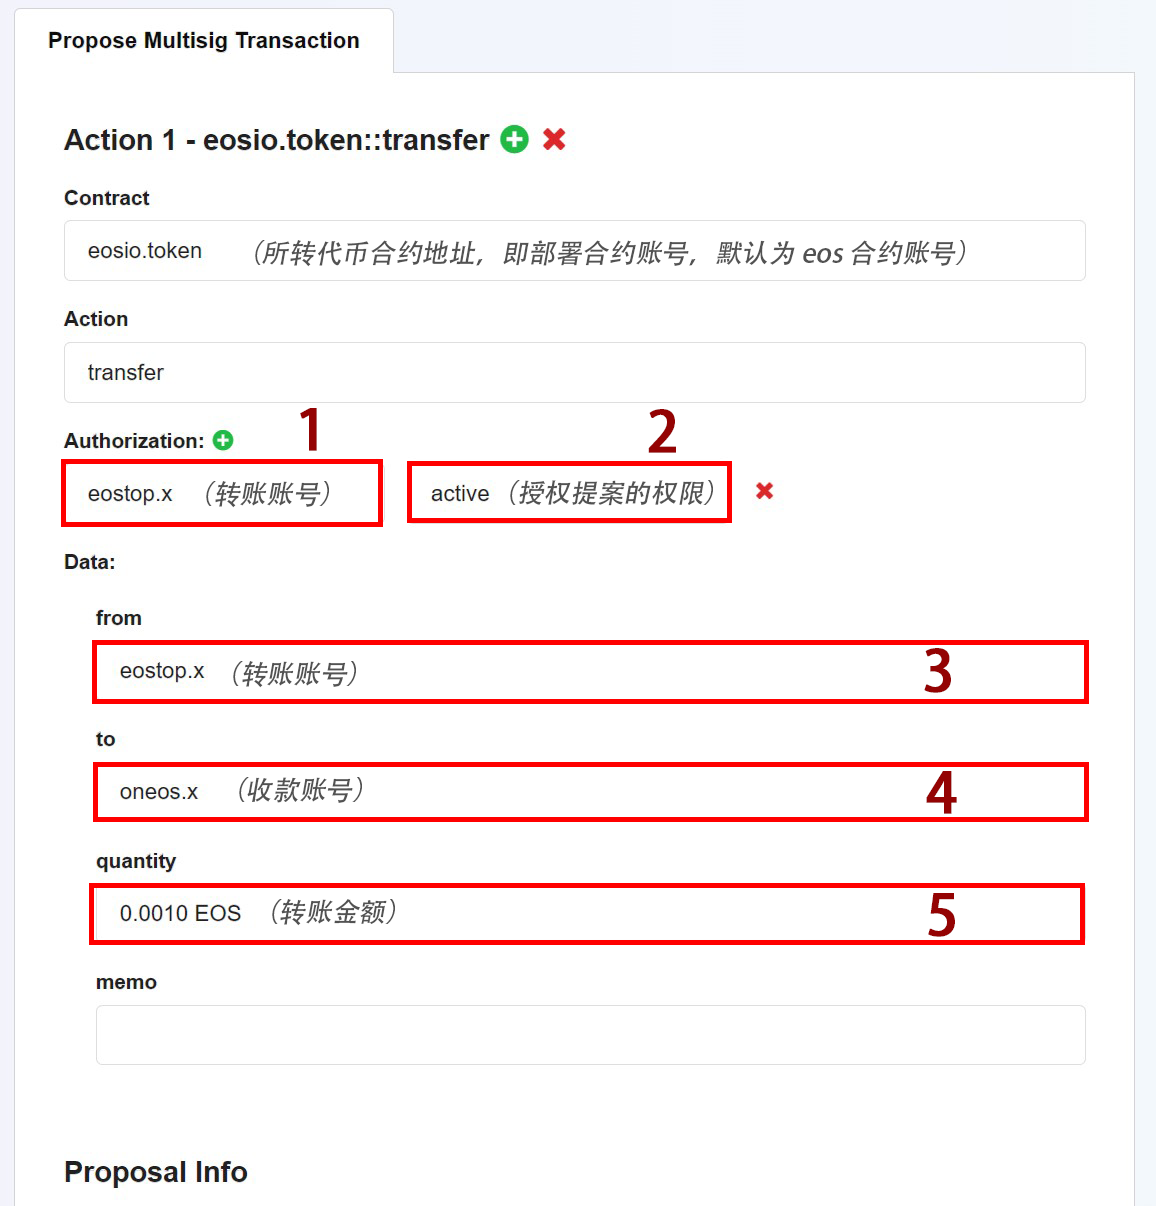
Based on the selected transfer token, the contract address will be filled in with the corresponding contract account. The receiving account and transfer amount at positions 4 and 5 will also be automatically filled in with the account and amount we entered earlier.
In the input fields at positions 1 and 3 in this interface, we enter the account that would execute the action in this proposal, i.e., the account we just set up with multi-signature management. At position 2, enter the permission of the account executing this proposal's action(s). If the owner permission is used, enter owner; if the manager permission is used, enter active. We just set up the active permission, so we should enter active. (We usually use the active permission.)
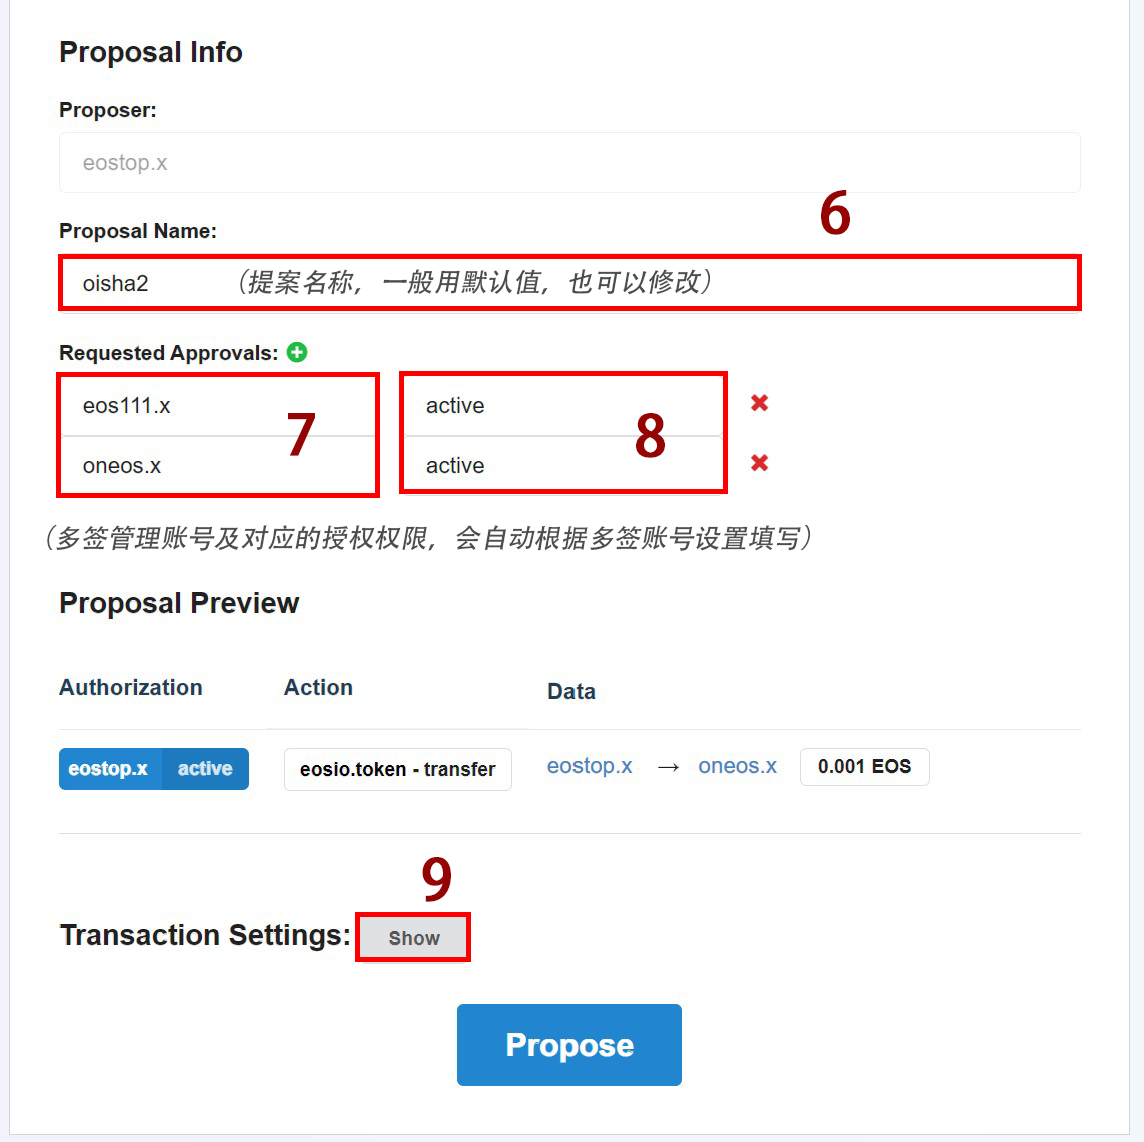
The roll down the page, as shown above, displays the proposal name at position 6. The system will fill in a default name but can also be modified. Positions 7 and 8 are for the management accounts of the multi-signature account that participate in authorizing the proposal. All accounts that participate in multi-signature management and their corresponding permissions (Active or Owner) will be filled in based on the permission settings of the multi-signature account.
After filling in the above information, click Show at position 9 to display more transfer settings.
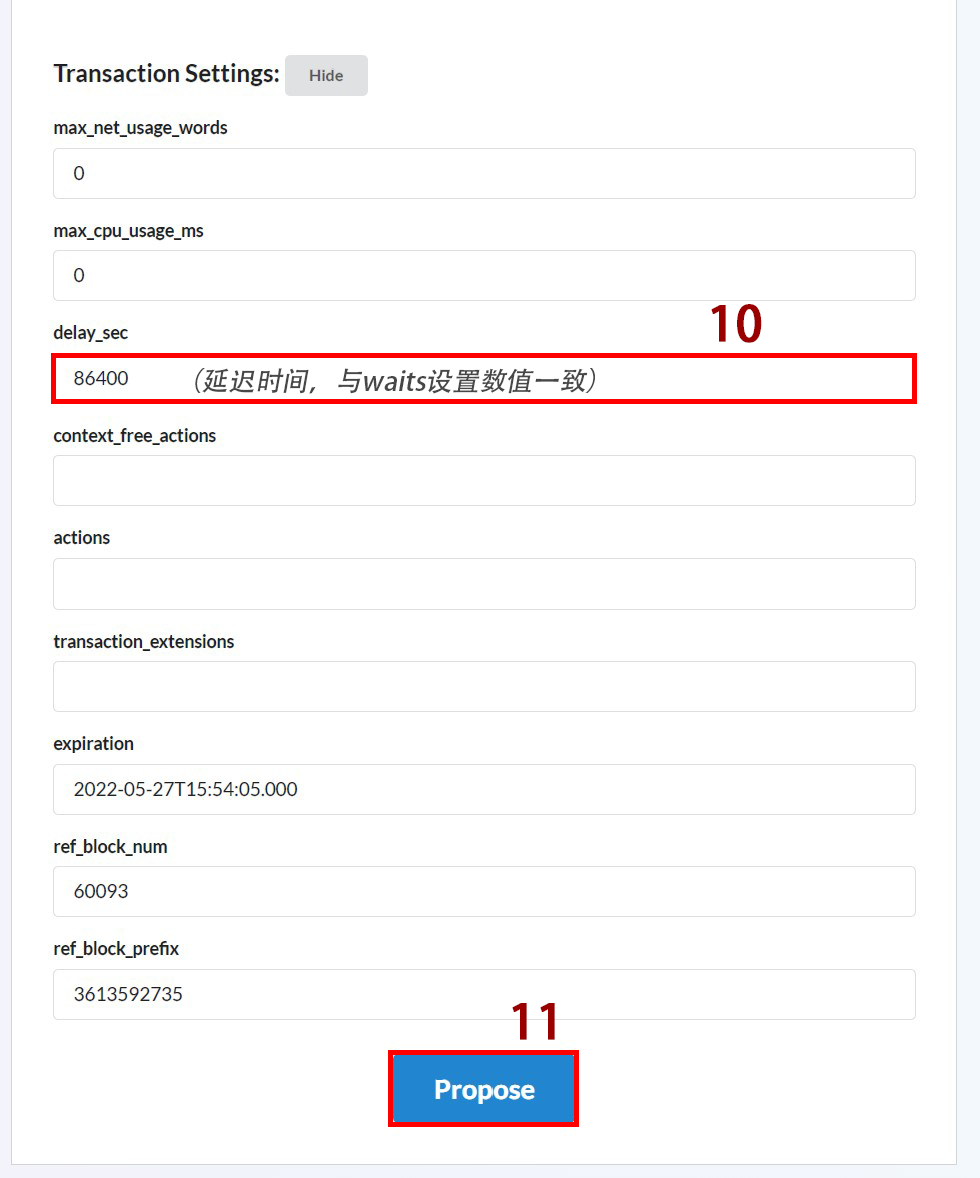
As shown above, enter the time delay value set in waits in the account permissions at position 10. In our example, it is set to 86400, 24 hours. After filling it in, click Propose at position 11 to initiate the proposal. After signing the transaction, the transfer proposal will be successfully initiated.
IV. Approving and Executing the Proposal
To approve a proposal, we need to find the proposal first. We can search for the proposal on the following link page of bloks.io:
You can search for the account that initiated the proposal or the proposal name to find the proposal. You can also find the proposal directly in the transaction records of the account that initiated the proposal. After finding the proposal, click on the proposal name to enter the proposal detail page as shown below.
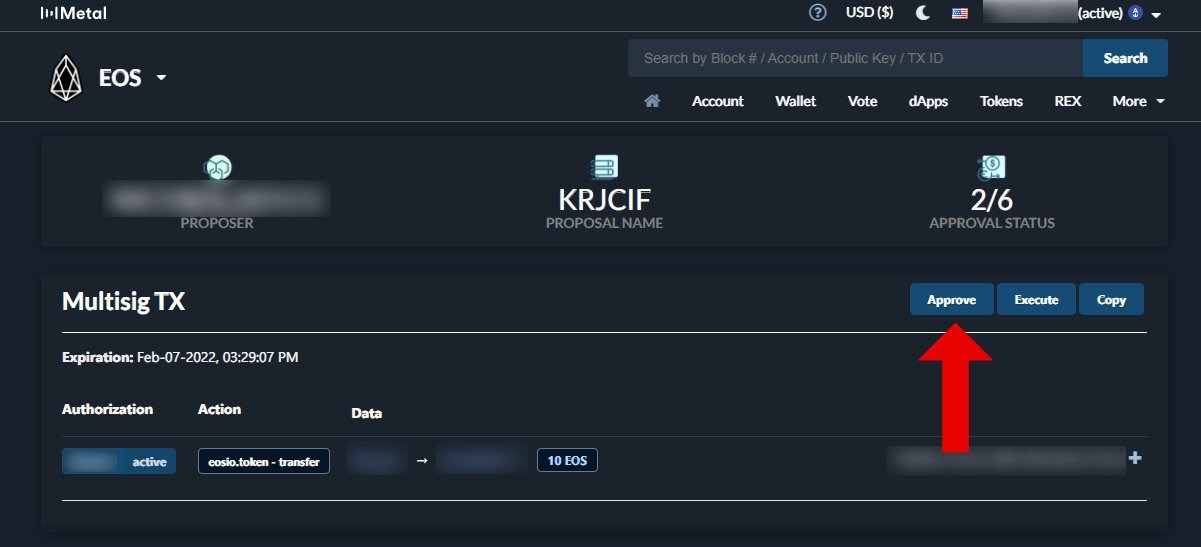
As shown above, after logging in to the account that participates in the multi-signature authorization, you can click on Approve at the position indicated by the red arrow above to approve the proposal. After verifying with the account management wallet, the approval will be successful.
Note that the authorization proposal needs to close the multi-signature mode.
The sum of the weights of all authorization accounts in our proposal (1+1=2) is less than the set threshold of 3, so waits must participate in the proposal to be approved and executed. This is also why we must set a transaction delay when initiating a proposal. After this time delay, the authorization weight corresponding to waits will be automatically added to the authorization weight. Therefore, our proposal will start counting after both participating multi-signature accounts have been authorized successfully. After 86400 seconds (24 hours), the authorization weight of this proposal will be 1+1+1=3, which is equal to the set threshold, and the proposal will be successfully approved.
After the last authorization account approves and a time delay of 86400 seconds (24 hours), any account can click on Execute in the multi-signature proposal interface to execute the proposal. After the execution is completed, the transfer is completed.
In conclusion, the setup of the multi-signature account with transaction delay has been completed, and a transfer multi-signature proposal for the account has been initiated.
Author: Josh Chung
Editor: Markus Hinrichs, Randall Roland
Sources and References:
Last updated:
Was this article helpful?
Have a specific question about this article?